I have chosen to focus on nails for my 'other' final shoot, the iconic Guy Boudin image for NARS is something that was hard to past on when looking at NARS as a brand. This image is so simple yet effective the layers of hands covering the eyes is something out couldn't flick past in a magazine, yet although the eyes are covered still has a sexuality about it that is so iconic for NARS.

Although i am very inspired by this image i want to create something new and exciting, i like the fact that the models face is not in the shot and the focal point is just about the nails. I began looking at this idea and found some very inspirational images, i like the idea of a hand coming through a wall or through the nail varnish itself as shown in some of the images below. As i was researching for my images i began to consider colour in both the composition and nail colour as shown in my mood board i have been draw to this pastel pink, blue and peachy/yellow tones- i love the graphic nature of the images and i feel i can really play with colour and give the shot an artistic edge something i feel inspires me and is fitting with NARS.

After talking to my tutors i have to include a profile and face on image including both hair and makeup in relation to the nails. I began looking back into my inspiration board, i love the idea of nails coming through something such as the image of the red paint. I then thought of the LOVE cover featuring Cara Delevine her in the bath a shown in my mood moodboard and began thinking how i could incorporate the model and nails coming through water in this way.

Colour Schemes
Colour Scrapbook App
Dulux.co.uk, (2015). [online] Available at: https://www.dulux.co.uk/en/scrapbook [Accessed 23 Apr. 2015].


When looking at this idea of putting my model into a milk bath i started look at the colours a pastel cream white blue in contrast with the colours within both the makeup and nails. An element i loved within my initial mood board was the strong sense of a pastel pink tones throughout many of the images. I looked at my two board next to one another and began thinking about the idea of using pastel pinks within the makeup to compliment against the pastel blue tone of the water. Above i have collected some colour swatches to begin to understand and visualise the conparison of colour tones. I have added the red as i love the red nails of the original Guy Bourdin X NARS image and would like to incorporate reference to this image using a red nail,the further connotations to a red nail i feel is relatable to NARS its a sexy sleek and classic timeless colour that can translate into any era.
Makeup Ideas


Facebook, (2015). NARS Cosmetics. [online] Available at: https://www.facebook.com/narscosmetics?fref=photo [Accessed 23 Apr. 2015].

I have began looking at the idea of the pastel pink tones used within the makeup look as explored previously the wet look eye was a key look to many of NARS looks on the s/s15 catwalk deisgners such as Naeem Khan and Rachel Corney played with the idea of dewy skin and wet look eye lids finalising in effective looks. I like the idea that the a wet look pink eye shadow mirrors the texture of the bath water and gloss of the nails creating a seamless composition with the final photographs. |
| Uk.pinterest.com, (2015). [online] Available at: https://uk.pinterest.com/milliejohns/nails-nars/ [Accessed 23 Apr. 2015]. |
I have created this chart based on my inspiration and initial ideas from the mood board above. I want to create a seamless texture throughout the final images, playing with this i have used the same colour tones within the eye shadow, cheek and lip tone. I want to create a high gloss shine on the lids and lip to mirror the texture of the nail polish and further a dewy skin base with emphases on the highlight of the face. I have also added next to the Chart the Nail polish that i will be using.

Products:
Complexion
-Moisturiser
-Illamasqua illuminous primer
-MAC face and body- C1
-MAC conceal and correct pallet/Light- NC15 & Pale yellow
-Rimmel Wake me up Concealer
-MAC Mineralize concealer- NC20
Face
-Illamasqua translucent powder
-MAC pigment- Naked
-Naked Neutrals Pallet- Venus
-Dior Bronzer- 002
-Illamasqua- pink
Eyes
-Naked Neutrals Pallet- Venus
-Illamasqua- tremble
-Bare minerals gloss- ring leader
-MAC studio fix lash- Black
Brows
-Naked Neutrals pallet
-Rimmel gel fixer in dark
Lips
-Illamasqua- tremble
-Bare minerals gloss- ring leader
Hair Ideas
As the look is in a bath i want to play on the S/S15 trend of the scrape back wet look style hair as been seen on catwalks, i have collected these images based on a down straight style with no partings creating that sleek clean look to the style.
 |
| Uk.pinterest.com, (2015). [online] Available at: https://uk.pinterest.com/milliejohns/nails-nars/ [Accessed 23 Apr. 2015]. |
I wanted to practise with my initial ideas for the hair from the board above i wanted the sleek scraped back straight style, although i do like the style i realised when i finished creating this style that the moment the hair will be submerged into the water the style with expand around the models head rather than stay sleek and down as in the images below. I want to find a way i can create this sleek style with more structure to hold the hair.


A big trend from the s/s15 catwalks were knotted bun's as seen below from left too right, Lanvin, Calvin Klein and Alexander McQueen. This is a really effective way of securing the hair out of the way from if drifting every were in the water yet is a little different to a normal twisted bun style. Furthermore i feel that a middle parting will add more structure to the front of the style rather than completely pulled back off the face loses any structure around the face with the hair.
 |
| Littlewhitesocks.co.uk, (2014). Fashion Week: S/S15 Beauty Highlights Part 1. [online] Available at: http://www.littlewhitesocks.co.uk/2014/11/beauty-highlights-hair.html [Accessed 23 Apr. 2015]. |
I have created a board based on my previous development ideas, the middle parting sleek knot bun. This look i feel will work a lot better within the water and further the middle parting adds more definition around the face.
 |
| Uk.pinterest.com, (2015). [online] Available at: https://uk.pinterest.com/milliejohns/nails-nars/ [Accessed 23 Apr. 2015]. |
Knot Bun Experimentation
I wanted to experiment as before to see if visually this style would work thinking about the shoot itself (in water) along the way. I have created below two variations of the knot but, created through experimenting with the positioning.
Simple Sleek Knot Bun: I like the sleek, cleanness to this style from the top of the style to the bottom the sleek idea is continuous by adding in the knot detail its more interesting. As this hair is very thick and long it looks a little bigger than i would want it, but i feel a smaller tighter knot would be more effective.


Knot bun with a flick: While experimentation with the knot bun i visualised the 'PAPER' cover shoot featuring Kim Kardashian, they explored a similar idea of the knot bun but by adding the tuft of hair out the top created a whole new style. I played with this idea i like the twist in the bun and the flick adds further dimensions but i do feel the style is not as sleek at the previous style created.


I have decided to do the first idea of the knot bun, i feel the style is a lot more sleek and will work better in the situation i will be shooting in. I also think that if i can achieve a high gloss effect to the sleek detail in the style it will further work better with both the makeup and nails using this element of the gloss texture.
Hair Chart
Sleek middle parting, knot bun style.
Equipment/ Products:
-Hair straighteners/ hair dryer
-Water Spray
-Mouse
-Hair Spray
-Pin Tail Comb
-Soft brush
-Paddle Brush
Step 1:
Making sure the hair is straight either by straightening or blow drying into this style. Part the hair into a direct central middle parting, using a water spray spray down the hair till damp in the sections and comb through, add mouse to the comb and again comb through.
Step 2:
Combing all the hair back into a long pony tail at the nape of the neck make sure there are no bumps in the style before tiring into place.
Step 3:
twist the pony tail until it begins to twist around its self, twist around and knot through tucking the excess hair behind the bun pinning into place with bun pins.

I wanted to experiment with the makeup's texture on the face from my face chart design. I played around with the products and found that to create a monochromatic seamless look, mixing the lip gloss shade and blusher/eye shadow shade together created a really nice wet look texture on both the eye and lip. I patted the gloss over the top of the shadow already applied and i love the effect, unlike the lip colour were i mixed together the powder pigment and lipgloss this gave a dense finish perfect for the lip.


My model had red nail varnish on from previous application, i got her to hold her hand up next to the look, i like the strong contrast between the two but yet they work well together the pink doesn't detract from the bold colour of the nail making this the focal point.

When looking at these images i wanted to experiment what the eye look would look like if i used mascara as i noticed that in my Face Chart the models lashes were a lot more visible than above. I prefer this look as i feel it defines the eye area a lot more than above creating a more polished look.


Nails -NARS- Shoot
I took some photographs before the milk bath to have a clear record of the makeup and hair look. I used all the same techniques i used in my practise as this worked well previously.


The Hair i kept sleek off the face in a middle parting into a knot bun as featured above in my development.

Final Images
This was a very interesting process and i felt i learnt a lot during this shoot. When i looked at images of models in water it always looked very effortless and clean. I found that i came across many obstacles during this shoot, firstly my model put her head straight into the water this meant that i couldn't get any photo's of the hair/makeup before it got wet and secondly the temperature of the bath/room was hot and steamy so this made the makeup drip off fairly quickly and mascara run and by the time the shoot got going and began to get some good images the makeup was barely there. I found that the milk powder, food colouring in the bath water was very effective form of colour and i love the effect of this in some of the final images. However when editing i found i had very few images that would be suitable for a Makeup brands advertisements (as there was no makeup/ poor makeup and hair quality) but many more very interesting more 'photography' images. Below are two images that i managed to photoshop into images that could represent a Makeup Brand, i feel there is potential for this idea but i would need to perfect it first, i feel the sleek element of NARS and the clean feel is missing in these images although the idea i feel is very NARS i don't feel the images are up to the standard i would like.

Other Images
The images below are from the same shoot, i feel there is something very capturing about these photographs the candid feel, clean lines and colour contrast creates a composition thats emotive. The pure colour of the water is interrupted by the strong red sexuality of the nail colour and this is what makes the photos for me.


As i previously discussed i don't feel that i have the photographs i wanted for this (Nails) NARS advertisement. I have decided to re shoot the look, I feel that from the process above i have a clear idea what worked and what didn't, the makeup look itself and nail colour worked well together and looking back to my initial boards the red nails and baby pink tone are elements that have been strong with from the beginning process. I also feel that the hair didn't work within the overall look i liked the slick back middle parted style but the knot bun was too messy in compassion, i want something thats sleek and works with the idea of the glossy, sleek clean feel of the overall look. I further feel that due to a short time span i don't have enough time to perfect the milk bath look, its something i feel i would have to do a few times before i got it right, there fore i will further look for other overall composition ideas for the final images. I will develop these ideas further before re shooting my final look.
Final Hair Chart
I have explored more s/s15 hair trends that suit this sleek low style, far right is from London Fashion week top s/s15 hair style, the variations of a chignon i love the chiton style its sleek but would work in my images as you would still be able to see the element from the side and front view.
 |
| Uk.pinterest.com, (2015). [online] Available at: https://uk.pinterest.com/milliejohns/nails-nars/ [Accessed 23 Apr. 2015]. |
Hair Experimentation
I wanted to play on the chignon idea further as shown in my mood board above there are different ways to create this style i wanted to see what would work best for the final look. From the previous shoot i liked the slick texture of the middle parting so i have kept this in the experimentative styles.
Central Chignon with dip: This is a tighter effect to the chignon, inspired by the image on my mood board above far right, similar to a bun style but curving under i think this is an interesting style, i like the dip effect in the middle this was created due to the thickness of the hair used.


Large Chignon All the way around: I much preferred this style than above, i feel its more effective and from all angles it looks like a strong shape. This is something i love about this style that even from the side or front you can see it unlike the knot buns or above chignon. I will have to find a model with thick hair to be able to create this style effectively or i will have to think about using props or padding to create this strong dense shape.


Model
I began thinking about the model i would use for the reshoot of this look. I went back to the images of my practise shoot of the makeup and found that her face could hold the look really well, her large eye area allowed the glossy eye to make more of an impact and she further has very thick her that would work perfectly for the Hair style. Further more from looking at these test shot images i have decided on not to use mascara as having looked back at my other shoot it detracted from the pastel tones of the eye, I prefer the effect of the eye without mascara also as my models lashes are fair they work better without the black mascara which is very dominant.

Final Hair Chart
Sleek middle parted chignon style around the whole back of the head (thick hair will be used so no padding required.)
Equipment/ Products:
-Hair straighteners/ hair dryer
-Water Spray
-Mouse
-Hair Spray
-Pin Tail Comb
-Soft brush
-Paddle Brush
Step 1:
Making sure the hair is straight either by straightening or blow drying into this style. Part the hair into a direct central middle parting, using a water spray spray down the hair till damp in the sections and comb through, add mouse to the comb and again comb through.
Step 2:
Combing all the hair back into a long pony tail at the nape of the neck make sure there are no bumps in the style before tiring into place.
Step 3:
Taking the pony tail barrel curl up and around your fingers rolling into the direction of the head, position to begin to create the chignon style all the way around and using bun pins pin the style into place starting from the middle working your way out to the sides.
Step 4:
Hair spray you hand and carefully stroke the fly away hairs into place this can also been done for the top part of the style.

Over all Composition
An element i felt was effective in the milk bath was the colour tone of the water, the neutral background was effective in relation to the rest of the makeup and nails (as pictured top right) I created this board based on the colour scheme and feel i was for the images. A neutral background i feel works best as it allows for the strong contrast between the red and pink to be the main focus, I want neutral lighting and background.
 |
| Uk.pinterest.com, (2015). [online] Available at: https://uk.pinterest.com/milliejohns/nails-nars/ [Accessed 23 Apr. 2015]. |
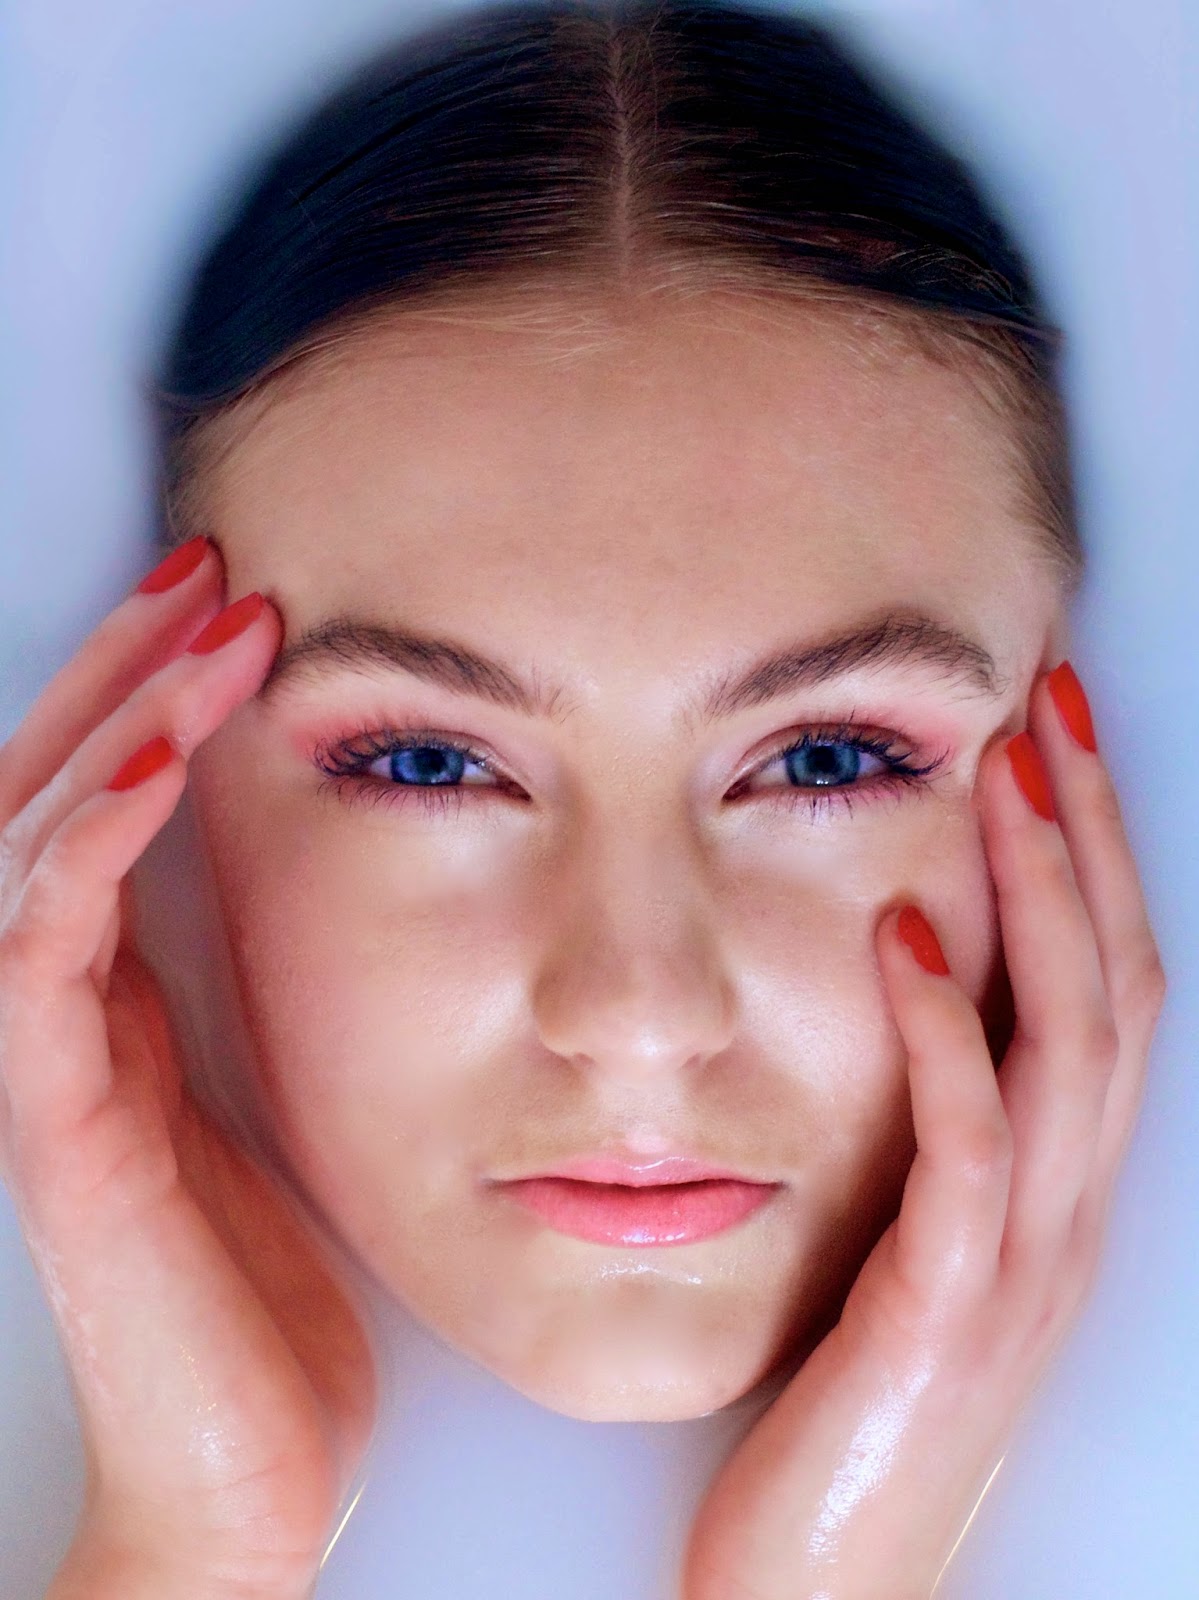
NARS- Nails Shoot
These are the final images from my re shoot, this shoot was very successful, the model i feel suited the look and the brand well, her large eyes made the wet look eye be more of a feature point yet the red nails pop through effectively. This time having chosen a neutral background it allows the model and look to shine through rather than the element that she's in water being the main focus.
The images are suited to the brand, in the way they combine a sexuality and a clean sleek style yet portray something alternative showing an experimentive side to the brand in the way that texture is explored in relation to what's being sold. The mirrored effect of the nail glossy texture within the rest of the look is effective and is clear what is being sold.


NARSxNAILS
These images i took on the day outside, i found the light was reflecting a tree onto this neutral wall. I feel that these images are the strongest, the look works well in the composition. The lighting is very strong in these photographs as it highlights the makeup perfectly, i love the way the reflection of the tree frames the model almost drawing your attention onto the lighter parts of the image such as the face and nails.


References/Image References:
Uk.pinterest.com, (2015). [online] Available at: https://uk.pinterest.com/milliejohns/nails-nars/ [Accessed 23 Apr. 2015].
Dulux.co.uk, (2015). [online] Available at: https://www.dulux.co.uk/en/scrapbook [Accessed 23 Apr. 2015].
Facebook, (2015). NARS Cosmetics. [online] Available at: https://www.facebook.com/narscosmetics?fref=photo [Accessed 23 Apr. 2015].
Littlewhitesocks.co.uk, (2014). Fashion Week: S/S15 Beauty Highlights Part 1. [online] Available at: http://www.littlewhitesocks.co.uk/2014/11/beauty-highlights-hair.html [Accessed 23 Apr. 2015].
No comments:
Post a Comment